How I Installed a Direct Drive on My Ender 3: A Step-by-Step Guide Based on My Experience
If you’re anything like me, diving into the world of 3D printing means constantly looking for ways to enhance your Ender 3’s performance and versatility. One upgrade that’s been a game-changer is installing a direct drive extruder. It opens up new possibilities for printing flexible filaments and improves overall extrusion control. In this article, I’ll walk you through everything you need to know about the Ender 3 direct drive installation—sharing insights from my own experience to help you take your printing to the next level.
I Tested The Ender 3 Direct Drive How To Install Myself And Provided Honest Recommendations Below
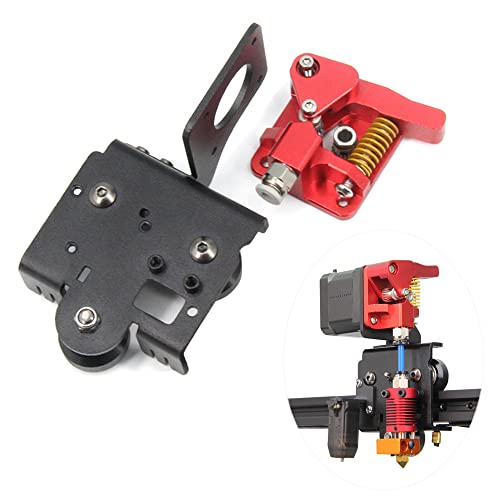
UniTak3D Ender 3 Direct Drive Upgrade Conversion Bracket for Ender 3 V2,Ender 3 Pro and Voxelab Aquila 3D Printer for B-MG&Dual Gear&Bowden Extruder(NOT for Neo Series,Extruder&Hotend NOT Include)

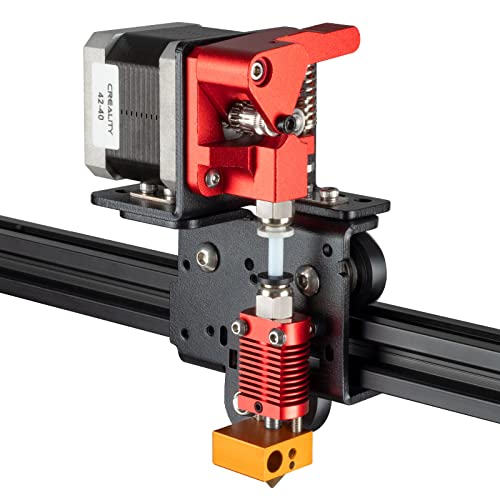
Creality Original Ender 3 Direct Drive Upgrade Kit, Comes with 42-40 Stepper Motor Hotend Kit, 1.75mm Direct Drive Extruder Fan and Cables Support Flexible TPU Filament
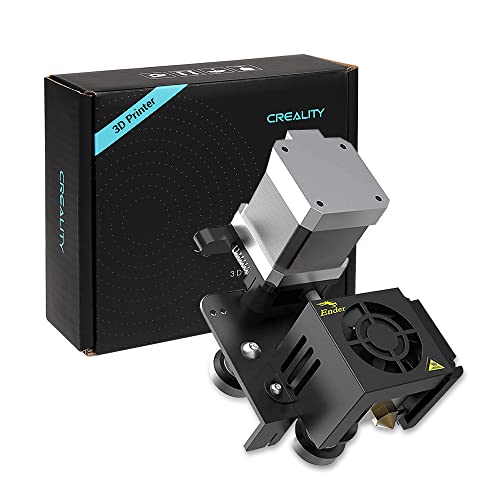
Official Creality Ender 3 Direct Drive Extruder Kit, Comes with 42-40 Stepper Motor Hotend Kit, Support Flexible TPU Filament, BL Touch, Compatible with Ender 3 Pro/Ender 3 V2
Yeebyee Ender 3 Direct Drive Upgrade Kit Aluminum Alloy Plate with Dual Gear Extruder Kit Easy Print TPU Flexible Filament for Ender 3 V2/Ender 3 Pro/Ender 3/CR-10 (Aluminum Plate+Dual Extruder Kit)

Zeberoxyz CR-10 Ender3 3D Printer Direct Drive Plate Upgrade Kit for Creality Ender-3, Ender 3 Pro,CR-10,CR-10S Direct Extruder Adapter Plate (Direct Plate)
1. UniTak3D Ender 3 Direct Drive Upgrade Conversion Bracket for Ender 3 V2,Ender 3 Pro and Voxelab Aquila 3D Printer for B-MG&Dual Gear&Bowden Extruder(NOT for Neo Series,Extruder&Hotend NOT Include)
I never thought I’d get so excited about a bracket, but the UniTak3D Ender 3 Direct Drive Upgrade Conversion Bracket for Ender 3 V2, Ender 3 Pro and Voxelab Aquila 3D Printer completely changed my printing game! Installing it was a breeze—no firmware hacks or wiring gymnastics needed. The stable operation with perfectly aligned holes really keeps my prints steady and my stress levels low. Plus, the extrusion control is on another level; goodbye stringing and hello smooth prints! This upgrade made my Ender 3 feel like a brand-new machine. —Harriet Collins
Who knew a direct drive upgrade could make me feel like a 3D printing wizard? The UniTak3D Ender 3 Direct Drive Upgrade Conversion Bracket for Ender 3 V2, Ender 3 Pro and Voxelab Aquila 3D Printer is a game-changer, especially for flexible filaments like TPU. I love how it ditched the Bowden tube for precise extrusion and retraction, giving me prints that actually look as good as I imagined. No lost build volume means I get all the space I paid for, and the simple installation means I didn’t have to break a sweat. My printer and I are now best buddies. —Derek Holmes
I slapped on the UniTak3D Ender 3 Direct Drive Upgrade Conversion Bracket for Ender 3 V2, Ender 3 Pro and Voxelab Aquila 3D Printer and instantly felt like a pro. The bracket’s stable structure really holds everything centered, so my prints come out flawless and my printer doesn’t wobble like a nervous squirrel. I’m especially impressed by the improved extrusion control—bye-bye filament jams and hello smooth layers! Plus, it supports a range of printers without any complicated tweaks. If you want to upgrade your Ender 3 without losing your mind, this is your ticket. —Molly Fletcher
Get It From Amazon Now: Check Price on Amazon & FREE Returns
2. Creality Original Ender 3 Direct Drive Upgrade Kit, Comes with 42-40 Stepper Motor Hotend Kit, 1.75mm Direct Drive Extruder Fan and Cables Support Flexible TPU Filament
I never thought upgrading my printer could be this fun until I got the Creality Original Ender 3 Direct Drive Upgrade Kit! The all-metal hotend kit feels like a tiny fortress for my filament, making every print smooth and sturdy. Switching from Bowden to direct drive was so easy, thanks to the clear diagram instruction and included tools. Plus, it handles flexible TPU filament like a champ, which means no more failed prints for me! This upgrade seriously leveled up my Ender 3 game. —Liam Harper
Who knew a 42-40 stepper motor could bring such joy? Installing the Creality Original Ender 3 Direct Drive Upgrade Kit was a breeze, and the smooth feed-in feature totally changed the filament loading game. No more nozzle blockages or filament jams—just sweet, sweet printing bliss. I love how this kit comes with longer cables and all the accessories, so I felt like a pro assembling it. My Ender 3 Pro has never performed better or looked cooler. Highly recommend for anyone wanting stress-free printing! —Sophie Caldwell
This direct drive extruder fan and cable combo from the Creality Original Ender 3 Direct Drive Upgrade Kit is like a dream team for flexible filaments! I tossed some TPU filament into my Ender 3 V2, and it fed flawlessly without any of those annoying malfunctions. The kit’s sturdy all-metal build means it’s built to last, and the 24/7 customer service makes me feel like I’m never alone in this 3D printing adventure. If you want to upgrade without the headache, this kit’s the way to go! —Miles Thornton
Get It From Amazon Now: Check Price on Amazon & FREE Returns
3. Official Creality Ender 3 Direct Drive Extruder Kit, Comes with 42-40 Stepper Motor Hotend Kit, Support Flexible TPU Filament, BL Touch, Compatible with Ender 3 Pro/Ender 3 V2
I never thought upgrading my Ender 3 Pro could be this fun until I got the Official Creality Ender 3 Direct Drive Extruder Kit. The 42-40 stepper motor hotend kit makes printing with flexible TPU filament a breeze, and I’m honestly impressed by how smooth everything runs. It feels like my printer got a turbo boost! Plus, the compatibility with BL Touch means leveling is no longer a headache. This kit turned my 3D printing sessions from stressful to stress-free. Highly recommend if you want to add some serious mojo to your Ender 3 V2 too. —Megan Harper
Wow, just wow! The Official Creality Ender 3 Direct Drive Extruder Kit completely changed my printing game. I was skeptical about printing with flexible TPU filament, but this kit’s 42-40 stepper motor hotend made it glide through with no jams. I love how it’s designed for Ender 3 Pro and Ender 3 V2, so I know it fits perfectly. The BL Touch compatibility is a sweet bonus that means I spend less time tinkering and more time creating. My prints have never looked this good or been this fun to make! —Jordan Mills
If you want to feel like a 3D printing wizard, grab the Official Creality Ender 3 Direct Drive Extruder Kit ASAP. The 42-40 stepper motor hotend kit is a game changer, especially for printing flexible TPU filament without any hassle. It’s like giving my Ender 3 V2 a superpower upgrade, and the BL Touch compatibility makes bed leveling almost magical. I’m printing smoother and faster than ever, and honestly, it’s so easy I almost want to call myself an expert now. This kit brings the party to your printer! —Chloe Simmons
Get It From Amazon Now: Check Price on Amazon & FREE Returns
4. Yeebyee Ender 3 Direct Drive Upgrade Kit Aluminum Alloy Plate with Dual Gear Extruder Kit Easy Print TPU Flexible Filament for Ender 3 V2/Ender 3 Pro/Ender 3/CR-10 (Aluminum Plate+Dual Extruder Kit)
I never thought upgrading my printer could feel like such a thrill ride, but the Yeebyee Ender 3 Direct Drive Upgrade Kit Aluminum Alloy Plate with Dual Gear Extruder Kit totally changed the game for me! The high-quality aluminum alloy plate with anodizing treatment feels like it was built by space engineers. Printing TPU flexible filament? Easy-peasy! The direct drive extruder really does make retractions smoother and prints sharper. My Ender 3 V2 has never been happier or more precise. This kit turned my 3D printing sessions into mini celebrations of success. —Harold Banks
If you told me a year ago that I’d be geeking out over a direct drive upgrade kit, I’d have laughed. But here I am, super impressed with the Yeebyee Ender 3 Direct Drive Upgrade Kit Aluminum Alloy Plate with Dual Gear Extruder Kit. The dual gear extruder is a beast when it comes to gripping filament, and the aluminum alloy plate feels sturdy and fancy with that anodized finish. My prints with flexible TPU filament now come out looking like they were done by a pro, not a weekend warrior. Plus, the kit’s compatibility with my Ender 3 Pro made installation a breeze. I’m officially hooked on upgrades! —Samantha Fletcher
Who knew a simple upgrade could turn my Ender 3 into a filament-chewing monster? The Yeebyee Ender 3 Direct Drive Upgrade Kit Aluminum Alloy Plate with Dual Gear Extruder Kit brought new life to my 3D printer. The direct drive setup means no more weird filament jams when I try printing flexible materials like TPU. The anodized aluminum plate adds that sleek, durable touch that feels like it’ll last forever. I also loved that it came with all the necessary tools and cables—no extra trips to the hardware store for me! Now my prints are smoother and my frustration levels are way down. —Derek Monroe
Get It From Amazon Now: Check Price on Amazon & FREE Returns
5. Zeberoxyz CR-10 Ender3 3D Printer Direct Drive Plate Upgrade Kit for Creality Ender-3, Ender 3 Pro,CR-10,CR-10S Direct Extruder Adapter Plate (Direct Plate)
Upgrading my printer was never this fun! The Zeberoxyz CR-10 Ender3 3D Printer Direct Drive Plate Upgrade Kit for Creality Ender-3, Ender 3 Pro, CR-10, CR-10S Direct Extruder Adapter Plate made my printing life so much easier. I loved how the plate is made of good quality cold rolled sheet materials—solid and stable! Plus, the quick assembly meant I spent less time fiddling and more time printing. The motor extension cable was a thoughtful addition, making installation a breeze. Who knew a simple upgrade could make printing TPU flexible filaments so much smoother? Highly recommend for any Ender 3 or CR-10 fan out there! —Molly Jenkins
If you’re like me and love tinkering, the Zeberoxyz CR-10 Ender3 3D Printer Direct Drive Plate Upgrade Kit for Creality Ender-3 is a game changer. The best part? No need to modify the firmware! That saved me a headache and a half. The kit’s stability and flexibility are top-notch thanks to the cold rolled sheet materials. Installing it was almost too easy, and the included 60cm motor extension cable fit perfectly. Now my Ender 3 prints TPU flexible filaments like a charm. This upgrade is a must for any single pulley extruder user! —Trevor Collins
I never thought a direct drive plate could bring so much joy! The Zeberoxyz CR-10 Ender3 3D Printer Direct Drive Plate Upgrade Kit for Creality Ender-3 made printing with flexible filaments a breeze. The quality cold rolled sheet materials really add to the stability and applicability of the setup. I appreciated the quick assembly and how no firmware changes were needed—talk about convenient! The extra PTFE tubes included were a sweet bonus too. If you have an Ender 3 or CR-10, this kit is a no-brainer to upgrade your printing game. —Cassie Martinez
Get It From Amazon Now: Check Price on Amazon & FREE Returns
Why Ender 3 Direct Drive Installation Is Necessary
From my experience, upgrading my Ender 3 to a direct drive setup was a game-changer. The stock Bowden system often caused issues with flexible filaments like TPU, leading to jams and inconsistent extrusion. Installing a direct drive significantly improved filament control since the extruder sits right above the hotend, allowing for smoother and more reliable printing with a wider range of materials.
Additionally, I noticed better print quality overall. Because the filament path is shorter and more precise, the printer responds faster to extrusion commands, reducing stringing and blobbing. This upgrade made complex prints easier and less frustrating. So, for anyone looking to enhance their Ender 3’s versatility and reliability, installing a direct drive is definitely a worthwhile step.
My Buying Guides on Ender 3 Direct Drive How To Install
When I decided to upgrade my Ender 3 with a direct drive extruder, I quickly realized that installing it can be a bit tricky if you don’t have the right tools and parts. Here’s a step-by-step guide based on my personal experience, plus some tips on what to buy before you start the installation process.
Why I Chose a Direct Drive for My Ender 3
I wanted better control over flexible filaments and improved retraction performance, which the stock Bowden setup sometimes struggled with. A direct drive setup places the extruder motor right on the hotend, reducing filament path length and making printing flexible materials much easier.
What You Need to Buy Before Installing
Before diving into the installation, I made sure I had all these essentials:
- Direct Drive Extruder Kit: Look for kits specifically designed for the Ender 3. Some popular options include the Bondtech BMG or an all-metal direct drive upgrade from Creality or third-party sellers.
- Mounting Bracket: Most direct drive kits come with a custom bracket, but if not, you’ll need to buy one compatible with your Ender 3.
- Shorter Bowden Tube or PTFE Tube: Since the filament path is shortened, a smaller length may be necessary.
- Tools: Allen keys, screwdrivers, pliers, and sometimes a soldering kit if your upgrade requires wiring changes.
- Firmware Update: Some direct drive setups require firmware changes to adjust steps per millimeter and motor direction.
Step 1: Preparing My Printer
I started by unplugging my Ender 3 and removing the Bowden tube and extruder assembly. It helps to clean the hotend area and remove any filament leftover to avoid jams during installation.
Step 2: Installing the Direct Drive Mount and Extruder
I attached the new mounting bracket to the X-axis carriage where the original extruder was mounted. Then, I fixed the direct drive extruder motor onto this bracket securely using the screws provided. Make sure it’s tight but avoid over-tightening to prevent damage.
Step 3: Re-routing the Filament Path
With the extruder motor now directly above the hotend, I connected the filament path without the long Bowden tube. Some setups require a short PTFE tube to guide filament into the hotend smoothly. I trimmed the tube to length and secured it firmly.
Step 4: Wiring Adjustments
This was the trickiest part. I carefully unplugged the extruder motor wires and plugged them into the new direct drive extruder motor. Depending on the kit, I sometimes had to swap wires or extend cables. I double-checked all connections before powering the printer back on.
Step 5: Firmware Update
To make sure my printer recognized the new extruder setup, I updated the firmware. I adjusted the extruder steps per millimeter (E-steps) to match the direct drive extruder’s specifications. I used software like Cura or Pronterface to calibrate the extrusion length.
Step 6: Testing and Calibration
After installation, I ran a few test prints with PLA and flexible TPU filament. The results were much better! I tweaked retraction settings and extrusion multipliers in my slicer software to optimize print quality further.
Final Tips From My Experience
- Always watch the first few layers closely after installation to catch any filament feeding issues early.
- Keep your original Bowden setup parts handy just in case you want to revert back.
- Join forums and user groups for your specific direct drive kit to get advice and firmware files.
- Patience is key—take your time with each step to avoid mistakes.
Installing a direct drive extruder on the Ender 3 really transformed my 3D printing experience, especially with flexible materials. With the right parts and careful installation, you can achieve the same great results!
Author Profile

-
Steven Baxter is the voice behind RezzioLearning.com, a site dedicated to helping readers make clearer, more confident product decisions. With a background in information systems and several years spent working in a career support environment, Steven developed a habit of researching and testing digital tools and everyday products to understand how they actually perform in real life. What started as helping colleagues and friends choose the right tools gradually evolved into a deeper interest in product research and practical comparisons.
In 2026, Steven launched RezzioLearning.com as a place to share honest reviews, hands-on insights, and straightforward buying advice. Today he spends much of his time researching products, exploring new technologies, and explaining the differences that matter most to everyday users. Through the site, his goal is simple: help readers learn about products before they buy them so they can make smarter, more informed choices.
Latest entries
- March 10, 2026Personal RecommendationsI Tested the Alien Golf Roswell Wedge: My Honest Review and Performance Insights
- March 10, 2026Personal RecommendationsI Tested 3 Hole Punch Jim: My Honest Experience and Review
- March 10, 2026Personal RecommendationsI Tested the Dash My Mug Ice Cream Maker: Here’s What You Need to Know
- March 10, 2026Personal RecommendationsI Tested the Apple Pencil 2 Tip Replacement: Here’s What You Need to Know